Whether you are a first time user of a rifle or whether you have been shooting for a while, sighting in a rifle scope can be a real frustrating part of the experience.
Luckily, there are these devices called Boresighters that can help you with your sighting. These devices can really help you speed up the sighting in the process.
But how do you do the sight-in without using a Boresighter? This is the article where we are going to be talking about this. So, let us get started.
Arrangement
The first thing you need to do is to make sure you have everything you need at your disposal.
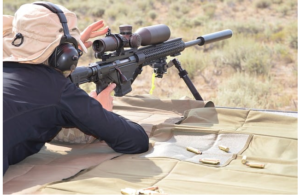
You are going to need a target first and then get other essential items such as proper hearing protection as well as a rifle with a scope that is already mounted.
Finally, ensure that you have all other tools that you might need to make all types of adjustments.
This will be based on the scope’s specific model and type. Take all the time you need to know your scope better before heading out at the target range. Understanding various rifle scope manufacturers, like Centerpoint Scopes, can provide valuable insight into your specific optical device.
How To Use A Rifle Scope Without A Boresighter?
Step 1: Ensure that the riflescope is mounted to the rifle. When you are done, set the eye relief and then set the focus of the reticle.
Step 2: Just make sure you have a solid rest to shoot from the sight-in.
If you don’t have a solid rest, it can be frustrating for you to get this right.
The rest does not really have to be something fancy. You can literally use some cloth or a shirt.
Step 3: Now you need to have a really safe place where you can shoot and catch the rounds with a backstop.
A backstop will help you stop the fired rounds in a very safe way and it also enables you to get a visual point of reference to determine where your rounds are hitting.
This can be done in relation to the target if your first shot is not really on paper.
Step 4: Set the sight in process at a distance of 30 to 50 yards if you are planning to shoot from 100 yards. When you get on paper, you can then move the distance.
Step 5: Perform a manual boresight. This is especially helpful for semi-automatic guns. You can also use it with bolt guns.
Step 6: Simply aim at the center X of the target and fire the shot.
Usually, the crosshair should be placed in the exact place and you then need to fire two shots. For a three-round group, you can hit three shots as compared to just one.
Step 7: You can now evaluate where the first three impacts are present on the target. Then start making adjustments as you go. You need precision adjustments for windage and elevation as well.
You can normally shoot with a single shot and then make the required changes. Also, do not really get confused so, make one adjustment at a time.
This tip will definitely help you out. Repeat the process now. When you can comfortably hit the target, move on to the preferred distance and then master that shot.
Step 8: You can now fire three shots to see where your new distance is at. When you do this start making adjustments.
You can also fine-tune the process by shooting a 10 shot group and then making adjustments as you go.
There are many shooters that like to save their ammunition so, they go for either 5 or 3 shot groups. But a 10 shot group is really good for a newbie.
With this being said, our final piece of advice to you is to reduce your shots down if you are sighting in with really heavy-caliber ammo with really bad recoil.
How Do You Use Manual Boresight?
The first thing you need to do is to remove the bolt from your rifle so you can see it all the way down the barrel. Now place the unloaded rifle with the mounted scope to the target.
And try to see the view down the barrel as well as the scope at the same time. This exercise helps you get a really good feel for where the scope is pointing in relation to your target.
You can then make adjustments to get the scope on paper.
With this method, you are able to at least get the first shot right on paper. This technique will definitely save you a lot of your time. For hunters and competitive shooters, understanding bullet drop compensation is crucial for accurate long-range shots.